By following this quick start guide, all end users can configure the prerequisite settings required to integrate with the Abritas choice based lettings solution. Once configured, the dynamic data exchange between the two systems supports two key processes: (1) The transfer of all void asset records ready for inclusion in the bidding process, and (2) The capture of all successful bid outcomes and associated applicant responses.
Step 1: Create custom asset characteristics consistent with the Abritas system
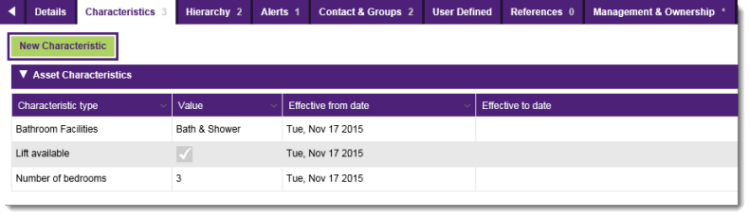
- Navigate to Quick Menu > Assets > Configuration > Asset Characteristics and create a series of custom parameter types to match the asset fields available within Abritas.
- Navigate to Quick Menu > System > Configuration > System Parameters, double-click on the system preference Abritas Asset Characteristics and select the subset of parameter types that will be captured within the Abritas output file.
- Using the global search facility, locate each asset record in turn and add the custom characteristics, as appropriate, completing the relevant attribute values based on the underlying data type e.g. an integer, a date field, a lookup, free text, etc.
- For more information, refer to the topics To define the asset characteristic types and To update the characteristics of an asset.
Step 2: Create user defined fields to match bespoke Abritas data components

- Navigate to Quick Menu > Repairs > Configuration > User Defined Definition and create a series of user defined fields to match the bespoke data components available within Abritas.
- Navigate to Quick Menu > System > Configuration > System Parameters, double-click on the system preference Abritas Asset User Fields and select the subset of fields that will be captured within the Abritas output file.
- Using the global search facility, locate each asset record in turn and add the user defined values, as dictated by the underlying data type e.g. an integer, a date field, a lookup, free text, etc.
- For more information, refer to the topics To create a user defined field and To update user defined fields for an asset.
Step 3: Define the 'Re-let Charge' for all asset void episodes
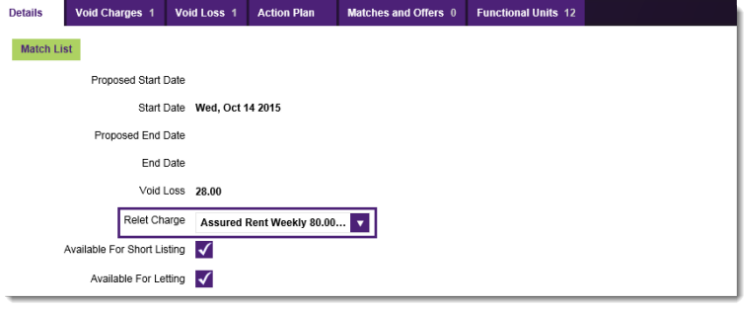
- Using the global search facility, locate each void asset record in turn, assigning the concatenated charging reference (charge type, charging frequency, value and effective period) that represents the total actual cost of all charge elements applicable to the asset i.e. the figure made visible to a potential bidder through a choice based lettings system.
- For more information, refer to the topic To define the status of an asset void episode.
Step 4: Extend the void action plan to include the system function 'Send Asset to CBL'

- Navigate to Quick Menu > System > Configuration > Action Plans, select the relevant void action plan (resource type: Organisation Asset) and insert the system function Send Asset to CBL.
- Using the global search facility, locate each void asset record in turn and select the additional Send Asset to CBL action from the linked plan.
- For more information, refer to the topics To add an action to a resource plan and To add an additional entry to an asset void action plan.
Step 5: Define a custom contact reference to store the Abritas applicant identifier
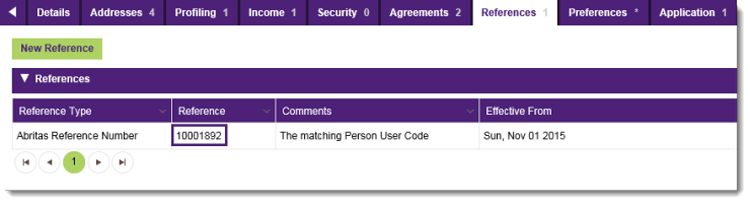
- Navigate to Quick Menu > System > Configuration > General Lookups and create a new Contact Reference Type parameter value to store the Person User Code i.e. the matching unique identifier for applicant records held across the two systems.
- Navigate to Quick Menu > System > Configuration > System Parameters and map the newly-created Contact Reference Type parameter value to the system preference Abritas Contact References.
- Using the global search facility, locate each contact record in turn and add the new Reference type, capturing the corresponding Person User Code held in Abritas.
- For more information, refer to the topics To define a general lookup parameter value, To define a system preference value and To add a new contact reference.
Step 6: Map the question set responses gathered within Abritas
- Navigate to Quick Menu > System > Configuration > Question Library and create a new library question for each discrete response gathered in Abritas, assigning the Category of 'Application Form'.
- Navigate to Quick Menu > System > Configuration > Form Template, select the relevant application form and add the choice based lettings questions via the Page Setup tab. For each linked question, the custom reference value employed by Abritas must be inserted into the External Question Reference field.
- For more information, refer to the topics To create a new entry in the question library and To add a library question to a form group.
See related topics...
Abritas data exchange management overview
To generate an asset void export file compatible with Abritas